- +44 1924 438238
- sales@ycr.co.uk
- Mon - Fri: 8:30 - 16:30
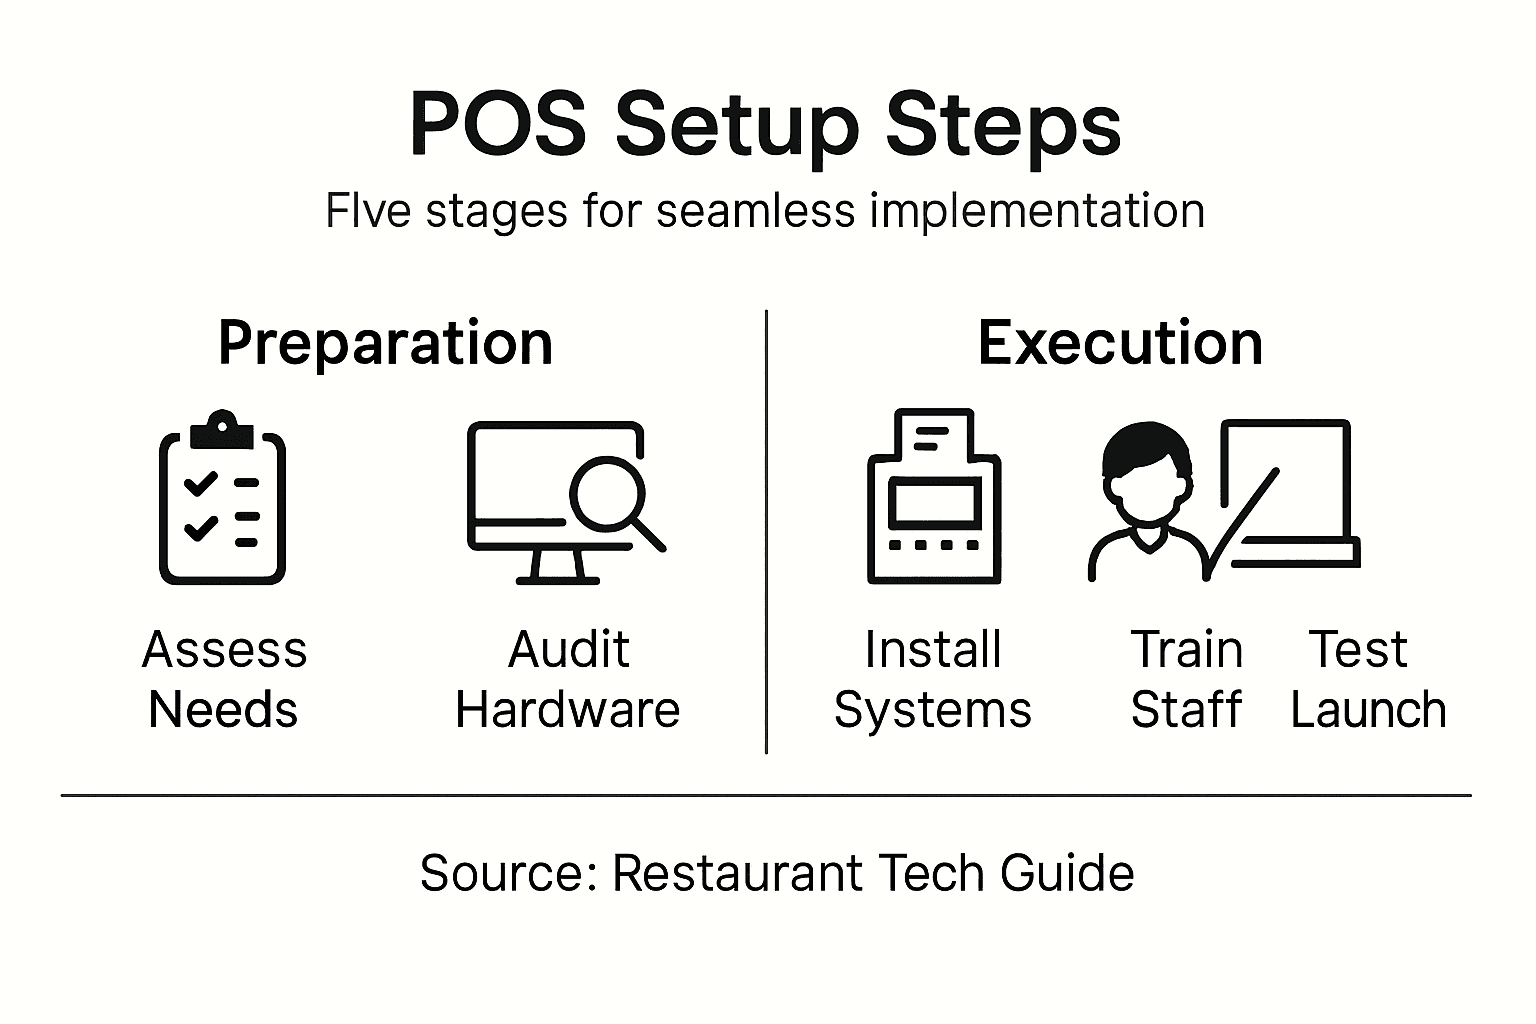
Restaurant POS Implementation Process for Seamless Setup
Running a busy restaurant or café in the UK often means juggling orders, managing inventory, and keeping customers happy all at once. Choosing the right POS system can make operations smoother and tackle day-to-day headaches like payment delays or reporting confusion. This guide walks you through each step of POS implementation so you build a setup tailored to your venue, speeding up service and improving the overall customer experience.
Table of Contents
- Step 1: Assess Needs And Select Pos Solution
- Step 2: Prepare Infrastructure And Gather Requirements
- Step 3: Install Hardware And Configure Software
- Step 4: Integrate Systems And Train Staff
- Step 5: Test Performance And Confirm Readiness
Quick Summary
| Key Insight | Explanation |
|---|---|
| 1. Assess Unique Needs | Understand your restaurant’s specific operations before selecting a POS system to avoid costly errors. |
| 2. Prioritise Integration | Ensure your POS integrates with existing tools to streamline processes and reduce manual data entry. |
| 3. Test Systems Thoroughly | Perform extensive testing under peak conditions to ensure reliability and efficiency before going live. |
| 4. Engage Staff in Training | Involve staff in training for tailored learning experiences that ensure smooth adoption and efficiency. |
| 5. Document Specifications | Create a clear list of must-have features and hardware requirements to guide vendor comparisons and decisions. |
Step 1: Assess needs and select POS solution
Before you invest in any POS system, take time to understand exactly what your restaurant needs. Every venue is different, and matching your solution to your actual workflows prevents costly mistakes down the road.
Start by mapping your current operations. How many covers do you serve daily? What’s your peak hour like? Do you handle table service, counter sales, or both? Understanding your specific challenges matters far more than chasing the latest features.
Consider your integration requirements. Modern POS systems need to handle order management, inventory tracking, and financial reporting alongside customer engagement. Think about whether you need these connected or if separate systems work for now.
The best POS system fits your restaurant’s unique workflow, not the other way around.
When evaluating solutions, assess these key areas:
- Payment processing: Can it handle your volume of transactions securely?
- Staff training: How quickly can your team learn the system?
- Customer experience: Does it support contactless payments and digital ordering?
- Scalability: Will it grow with your restaurant or limit you?
- Support availability: Can you reach someone when issues arise?
Check whether you need cloud-based or on-premise solutions. Cloud systems offer flexibility and remote access, whilst on-premise installations give you complete control but require more maintenance. Your internet reliability and security preferences should guide this choice.
Here’s a comparison of cloud-based vs on-premise POS systems, highlighting their core differences:
| Aspect | Cloud-Based POS | On-Premise POS |
|---|---|---|
| Accessibility | Remote access from anywhere | Limited to restaurant premises |
| Maintenance | Updated automatically by vendor | Manual updates by staff or IT |
| Data Security | Depends on vendor’s cloud protocols | Managed in-house, full control |
| Internet Reliance | Requires reliable connectivity | Operates offline, less internet dependency |
| Upfront Cost | Lower hardware investment | Higher installation and hardware cost |
| Scalability | Easily scales with business growth | More complex, often costly upgrades |
Think about reporting capabilities. Do you need real-time sales dashboards? Inventory alerts? Staff performance tracking? These features vary significantly between systems, and overlooking them during selection creates friction later.
When comparing options, request trials or demos from multiple vendors. Test the systems during your actual service to see how they perform under real pressure. Ask existing clients about their experience, particularly restaurants similar in size to yours.
Pro tip: Document your must-haves versus nice-to-haves before speaking with vendors. This clarity prevents sales teams from overselling features you’ll never use and helps you negotiate realistic pricing for what you actually need.
Step 2: Prepare infrastructure and gather requirements
Now that you’ve identified your needs, it’s time to audit your current infrastructure and document exactly what your restaurant requires. This groundwork prevents compatibility issues and ensures your new POS integrates smoothly with existing operations.
Start by evaluating your network capabilities. Check your internet speed, stability, and bandwidth during peak service times. A POS system that crashes when you’re busiest costs far more than the investment itself. If you’re considering cloud-based solutions, reliable connectivity is non-negotiable.
Walk through your restaurant and document hardware requirements. How many terminals do you need at different stations? Kitchen, bar, front desk, takeaway counter? Consider your physical layout and where terminals will sit. Measure spaces, check power outlets, and identify network access points.
Strong infrastructure planning now prevents expensive retrofits and operational disruptions later.
Conduct a thorough audit of legacy systems and technological infrastructure across your kitchen, dining areas, and back office. Document what’s currently in place, what works well, and what creates headaches.
Gather detailed operational requirements by consulting your team:
- Kitchen staff: What workflow issues frustrate them daily?
- Front-of-house: How do they currently handle orders and payments?
- Managers: What reporting data do you actually review?
- Finance: What reconciliation processes do you need?
Identify your current business challenges. Are staffing shortages affecting service speed? Does inventory management create waste? Are supply chain disruptions impacting ordering? Your POS solution should address these pain points, not ignore them.
Document software compatibility needs. Which accounting systems, reservation platforms, or delivery apps do you use? Your new POS must connect to existing tools or integration becomes painful and expensive.
Create a clear specifications document listing your must-have features, preferred hardware, integration requirements, and timelines. This becomes your evaluation checklist when comparing vendors.
Pro tip: Involve your entire team in the requirements gathering process. They’ll reveal operational bottlenecks you’d miss, and early involvement builds buy-in for the eventual system change.
Step 3: Install hardware and configure software
This is where your POS system comes to life. You’ll install terminals, printers, scanners, and other hardware, then configure the software to match your restaurant’s operations. Proper installation now saves countless troubleshooting hours later.

Begin by setting up your physical hardware in the locations you documented earlier. Install terminals at each station—front desk, kitchen, bar, or takeaway counter. Ensure each device has reliable power and network access. Test connectivity thoroughly before moving to software configuration.
When installing POS hardware across different stations, follow the vendor’s setup guide carefully. Mount displays at comfortable viewing heights. Position receipt printers where staff can easily retrieve receipts without disrupting service. Label every cable and device to prevent confusion during troubleshooting.
Rushing hardware installation creates technical headaches that damage staff confidence in the entire system.
Once hardware is physically installed, connect everything to your network. Verify that all devices communicate properly with the central system. Test payment terminals, kitchen displays, and reporting connections individually before going live.
Now configure your software settings:
- Set up user accounts for each staff member with appropriate permission levels
- Input your menu with accurate pricing, modifiers, and product codes
- Configure payment methods including card processing, cash tills, and voucher systems
- Establish reporting categories for sales analysis and inventory tracking
- Test all workflows with sample transactions before live service
Configure integrations with your existing systems. Connect to your accounting software, reservation platform, or delivery apps. Test these connections thoroughly in a non-live environment first.
Involve your team in configuration decisions. How should the menu display? Where should payment options appear on screen? Staff input ensures the system reflects how your restaurant actually operates, not how vendors think it should.
Run complete system tests simulating your busiest service period. Process payments, print receipts, generate reports, and verify nothing breaks under pressure.
Pro tip: Create detailed documentation of your configuration settings, user account permissions, and integration connections before going live. This becomes invaluable if something breaks and you need to troubleshoot quickly during service.
Step 4: Integrate systems and train staff
Your POS system doesn’t operate in isolation. You’ll now connect it to your existing business tools and prepare your team to use everything effectively. Strong integration and thorough training determine whether your investment succeeds or struggles.
Start by connecting your core systems. Your POS should integrate with accounting software for financial reconciliation, inventory platforms for stock tracking, and reservation systems if you take bookings. Each connection reduces manual data entry and prevents information gaps that create costly errors.
Here is a quick reference table summarising POS integration priorities for restaurants:
| Integration Area | Key Benefit | Examples |
|---|---|---|
| Accounting | Accurate financial reconciliation | Xero, QuickBooks |
| Inventory | Reduces waste and shortages | MarketMan, SimpleOrder |
| Reservations | Streamlines booking management | OpenTable, ResDiary |
| Delivery Apps | Expands sales channels | Uber Eats, Deliveroo |
Set clear integration goals before connecting systems. Which data flows must happen automatically? Where can manual processes remain acceptable? This clarity prevents over-complicated setups that confuse staff and create maintenance headaches.
Staff who understand the system become your strongest advocates for successful implementation.
Now focus on your most critical task: staff training. Develop role-based training plans customised to specific task requirements such as order entry, payment processing, and kitchen display systems. A chef needs different training than a front-desk receptionist, and both differ from managers reviewing financial reports.
Create structured training by role:
- Kitchen staff: How to read orders on display systems and mark items complete
- Front-of-house: Processing orders, handling payments, and managing customer interactions
- Bar staff: Drink ordering, modification requests, and separate payment handling
- Managers: Accessing reports, reviewing performance data, and staff scheduling
- Finance: Reconciliation, payment processing, and financial reporting
Use interactive training tools embedded in modern POS software. Most vendors provide guided tutorials, demo modes, and practice scenarios where staff can learn without affecting live transactions. These tools accelerate competency and reduce frustration during the learning phase.
Conduct hands-on training during quiet service periods. Let staff process real transactions under supervision before going fully independent. Practice common scenarios—splitting bills, processing refunds, handling payment issues—until responses become automatic.
Create quick-reference guides and laminate them at each station. Include troubleshooting steps for common problems so staff know what to do when something goes wrong.
Track training progress and identify staff needing additional support. Some people learn quickly whilst others need more time and attention, and that’s entirely normal.
Pro tip: Assign experienced staff members as “POS champions” who become go-to experts for their colleagues. This distributes training burden, builds staff confidence, and creates internal knowledge keepers for ongoing support.
Step 5: Test performance and confirm readiness
Before your restaurant goes live with the new POS system, rigorous testing prevents disasters during actual service. You’ll validate that transactions process correctly, systems communicate properly, and everything handles your peak-time volume without crashing.
Start with functional testing. Process sample transactions through every workflow your staff will encounter. Test order entry, modifications, payment processing, refunds, and split bills. Try all payment methods you offer—cards, cash, contactless, vouchers. Document any issues you discover.
Test your system integrations thoroughly. Verify that sales data flows to accounting software correctly. Check that inventory updates reflect orders placed. Confirm reservation systems sync with your POS. Integration failures often hide until you go live, so test extensively in a non-live environment.
Conduct performance testing under peak-time conditions to ensure your system handles your busiest service periods without degradation. Simulate your highest transaction volume. Multiple terminals should process payments simultaneously without slowdowns. Kitchen displays must update instantly when orders arrive.
A system that works during quiet testing but fails under real pressure costs far more than thorough pre-launch testing.
Perform these critical tests:
- Transaction speed: Can the system process 50 orders per hour without lag?
- Connectivity: Does the system maintain connection if your internet briefly drops?
- Error handling: How does the system respond when payment processing fails?
- Report generation: Do financial reports calculate correctly and match expectations?
- User interface: Can your staff complete tasks quickly without frustration?
Test security thoroughly. Verify that payment data encrypts properly. Confirm that user permissions work as intended and staff cannot access data they shouldn’t. Test that your backup and recovery processes work if something fails.
Involve your staff in testing. They’ll discover usability issues that developers miss. Their feedback reveals whether the system supports how your restaurant actually operates.
Create a readiness checklist documenting what must work before going live. All critical functions should pass testing. Minor issues can be addressed post-launch if they don’t affect operations.
Schedule your go-live during a slower service period, perhaps a Tuesday or Wednesday afternoon. This gives your team breathing room as they transition to the new system.
Pro tip: Set up real-time monitoring and alert systems before going live so you can detect problems immediately and respond whilst they’re still small issues rather than service-threatening crises.
Simplify Your Restaurant POS Implementation with Trusted Hardware and Software Solutions
Implementing a restaurant POS system that truly fits your unique workflow can feel overwhelming. Challenges like matching the right hardware to your operations, ensuring seamless software integration, and delivering thorough staff training are critical for a smooth transition. At YCR Distribution, we understand these pain points and breathe life into your vision with dependable POS terminals, scanners, and tailored software designed specifically for hospitality environments.
Take control of your restaurant’s success by partnering with a POS provider who offers trusted brands, fast delivery, and expert support every step of the way. Explore how our solutions like SAMTOUCH and EZEEPOS can streamline your setup, enhance customer service, and support your growth ambitions. Don’t wait for costly missteps to disrupt your business—visit YCR Distribution now to discover seamless POS integration and hardware solutions crafted for your needs. Begin your journey to effortless POS implementation today.
Frequently Asked Questions
How do I assess my restaurant’s needs before selecting a POS system?
Before selecting a POS system, start by mapping your current operations, including daily covers and peak hours. Identify specific challenges you face and document any integration requirements for order management, inventory tracking, and reporting.
What should I consider during the installation of POS hardware?
Consider the physical layout of your restaurant when installing POS hardware. Ensure that terminals, printers, and scanners are placed conveniently at key stations while verifying reliable power and network access for each device.
How can I effectively train my staff on the new POS system?
To train your staff effectively, develop tailored training plans based on their roles and responsibilities. Incorporate hands-on practice during quieter service periods, allowing them to process real transactions under supervision before going fully independent.
What are the key areas to focus on when testing the new POS system?
Focus on functional testing by processing sample transactions, verifying system integrations, and conducting performance tests under peak conditions. Ensure that transaction speed, connectivity, error handling, and user interface meet your operational needs before going live.
How do I ensure my new POS system integrates well with existing platforms?
To ensure seamless integration, document your current software compatibility needs and assess which systems your POS must connect with. Validate these connections through thorough testing before going live to prevent data discrepancies and manual entry errors.
What steps can I take to prepare my restaurant’s infrastructure for a new POS system?
Prepare your restaurant’s infrastructure by auditing your current network capabilities and documenting hardware requirements. Ensure your internet speed and stability can support a cloud-based solution if chosen, and determine the layout for terminals and other devices accordingly.